Our team, in early 2019, created a line of business (LOB) web application to contain a few simple forms that would then push that form data to Azure DevOps via API as a work item type. The application has a form builder/editor where the forms can be dynamically authored/edited and stored in an Azure Cosmos DB. The form editor is only to be accessed by application managers, so the application has Azure Active Directory authentication and role based access (RBAC) security. This web application is version one.
In late 2020 our team created a version two of the web application with quite a few improvements and a change in the language framework.
This is a comparison of the two applications and the development frameworks used.
Version one
For version one of the application, we used React and TypeScript for the client code and .NET Core 3 / C# for the backend code. At the time of project spin up, Blazor was not 100% released and not recommended for production products. Our team of developers were familiar with TypeScript and were just learning React. Our senior developers where very familiar with .NET and C#.
Version two
For version two of the application, we used Blazor for the client and .NET Core 5 / C# for backend. At the time of project spin up, Blazor was now released along with .NET Core 5. As with version 1, our team has a chance to learn a new client framework and continue to use the familiar .NET Core and C# for our backend.
In quick summation, we really loved moving to Blazor for it simplified things quite a bit. But it also had some paint points. Below is a list of items to call out where we had some improvements by switching to Blazor for the client framework.
Yes, it can be argued that mixing React/TypeScript client and C# backend is not the best architecture, but this is just a case study of our experience.
| React | Blazor | |
|---|---|---|
| Less code written | We duplicated models in C# and in TypeScript to serialize and deserialize data from the client to the backendWe had duplicated enum types in TypeScript and in C#We had client authentication framework and backend authentication framework (This will be called out again below) | All backend C# Models, enum types, etc. are shared with the client, so we reduce a lot of duplication of code |
| Authentication Frameworks | We used MSAL.js on the client to authenticate against AAD and to make sure areas can be accessed via RBACWe had to make API/Backend calls to C# Controller to get the user roles from the databaseWe had backend authentication checks as well using the Microsoft.AspNetCore.Authentication framework | We used Microsoft.Identity.Web on the backend to secure all API/Controller accessThe client extends Blazor’s built in AuthenticationStateProvider to get the authenticated user information from the backend cache when needed |
| More familiar markup syntax | Not a lot of our developers were familiar with React syntax, but had TypeScript experience. The backend developers where not familiar with React or TypeScript and just C# | Our developers are more familiar with the Razor-type syntax and using C# in the client and in the backend made things much easier |
| Mature Component Libraries | There are much more mature component libraries for React and simple to set up | We used a collection of a few open source component libraries to use and were slightly difficult to set upLots of missing features in the components that we needed (We looked into Kendo UI for Blazor and was a bit difficult to get setup and integrated to our application) |
| Application Performance | Our React v1 application loaded fast and performed very well | There is the initial load performance hit that is known for the framework, but we had a couple of components that did not perform well either (We mitigated some of this by using tips and tricks from the community) |
Visual comparison
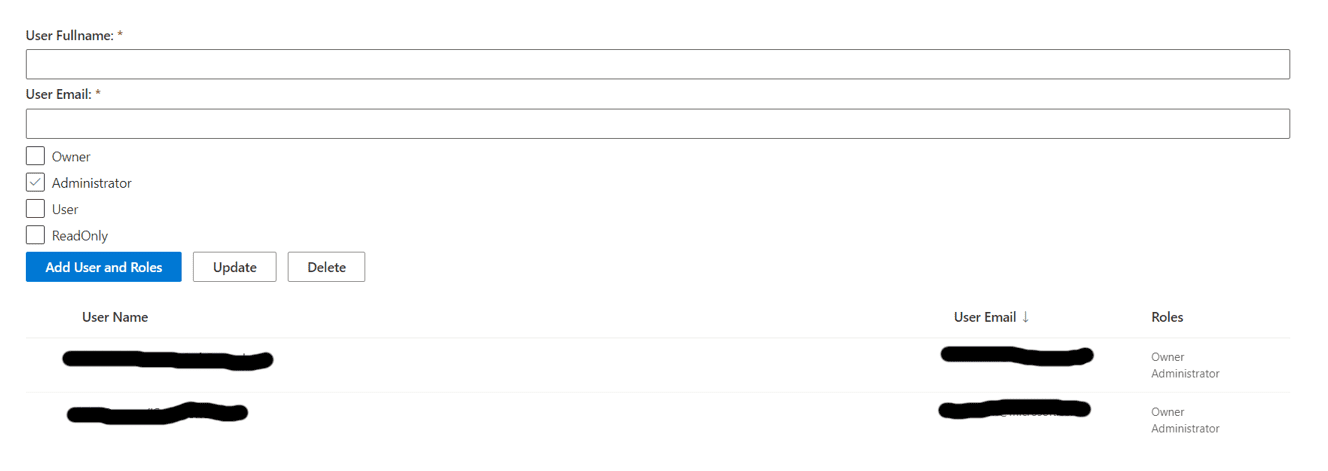
Let’s look at a simple page, our role manager, and see how the two frameworks are very close.

<div className=”ow-role-inputs”
<Checkbox label=”Owner” title=”Owner” name=”role”
checked={this._getSavedCheckState(“Owner”)}
onChange={this._handleInputChange} />
<Checkbox label=”Administrator” title=”Administrator” name=”role”
checked={this._getSavedCheckState(“Administrator”)}
onChange={this._handleInputChange} />
<Checkbox label=”User” title=”User” name=”role”
checked={this._getSavedCheckState(“User”)}
onChange={this._handleInputChange} />
<Checkbox label=”ReadOnly” title=”ReadOnly” name=”role”
checked={this._getSavedCheckState(“ReadOnly”)}
onChange={this._handleInputChange} />
</div>
<div className=”ow-confirm-buttons”>
<PrimaryButton className=”ow-confirm-button” type=”submit” text=”Add User and Roles” allowDisabledFocus />
<DefaultButton className=”ow-confirm-button” text=”Update” onClick={() => this._updateUserRoles()} allowDisabledFocus />
<DefaultButton className=”ow-confirm-button” text=”Delete” onClick={() => this._deleteRoleUser()} allowDisabledFocus />
</div>
</form>
<DetailsList
columns={this.state.columns}
constrainMode={ConstrainMode.horizontalConstrained}
enterModalSelectionOnTouch={false}
isHeaderVisible={true}
items={this.state.items}
layoutMode={DetailsListLayoutMode.justified}
selectionMode={SelectionMode.single}
selection={this._selection}
selectionPreservedOnEmptyClick={true}
setKey=”set”
checkboxVisibility={CheckboxVisibility.onHover}
/>
</React.Fragment>
) : undefined }
<BFUCheckbox Label=”Administrator”
Checked=”@userData.Roles.Where(x => x.RoleName.Equals(“Administrator”)).Any()”
CheckedChanged=”@(eventArgs => { RoleChange(“Administrator”, eventArgs); })” />
<BFUCheckbox Label=”User”
Checked=”@userData.Roles.Where(x => x.RoleName.Equals(“User”)).Any()”
CheckedChanged=”@(eventArgs => { RoleChange(“User”, eventArgs); })” />
<BFUCheckbox Label=”ReadOnly”
Checked=”@userData.Roles.Where(x => x.RoleName.Equals(“ReadOnly”)).Any()”
CheckedChanged=”@(eventArgs => { RoleChange(“ReadOnly”, eventArgs); })” />
</div>
<div>
<BFUPrimaryButton ClassName=”ow-confirm-button” type=”submit”
text=”Add User and Roles” @attributes=”InputAttributes”
Disabled=”@(userData.Id != Guid.Empty)”
AllowDisabledFocus=”true” />
<BFUDefaultButton ClassName=”ow-confirm-button”
Disabled=”@(userData.Id == Guid.Empty)”
text=”Update” OnClick=”UpdateUserAsync”
AllowDisabledFocus=”true” />
<BFUDefaultButton ClassName=”ow-confirm-button”
Disabled=”@(userData.Id == Guid.Empty)”
text=”Delete” OnClick=”DeleteUserAsync” AllowDisabledFocus=”true” />
</div>
<div data-is-scrollable=”true”>
<BFUDetailsListAuto ItemsSource=”UserRoleListItems” TItem=”RoleBasedAccessModel”
IsHeaderVisible=”true”
Columns=”Columns”
GetKey=@(x=>x.Id)
LayoutMode=”DetailsListLayoutMode.Justified”
SelectionMode=@SelectionMode.Single
Selection=”SelectedItem” />
</div>
private _handleSubmit = (event: React.FormEvent<HTMLFormElement>) => {
event.preventDefault();
var userDataModel = {
email: this.state.item.userEmail,
name: this.state.item.userFullName,
roles: this.state.item.roles && this.state.item.roles.length ? this.state.item.roles.map(r => r.roleName) : []
};
ApiHelper.CallApiForJson({ body: JSON.stringify(userDataModel), method: FetchMethod.Post, route: ApiRoute.Admin })
.then((json) => {
this.setState({ item: json });
this._getAllUsersAndRoles();
})
.catch(error => this.setState({ status: PageStatus.Error, statusMessage: `User entry creation failed with message: ${error}` }));
};
private _updateUserRoles() {
var roles = this.state.item.roles ? this.state.item.roles.map(r => r.roleName) : [];
ApiHelper.CallApi({ body: JSON.stringify(roles), id: this.state.item.id, method: FetchMethod.Patch, route: ApiRoute.Admin })
.then(response => this._getAllUsersAndRoles())
.catch(error => this.setState({ status: PageStatus.Error, statusMessage: `User role update failed with message: ${error}` }));
}
private _deleteRoleUser() {
ApiHelper.CallApi({ id: this.state.item.id, method: FetchMethod.Delete, route: ApiRoute.Admin })
.then(response => this._getAllUsersAndRoles())
.catch(error => this.setState({ status: PageStatus.Error, statusMessage: `User record deletion failed with message: ${error}` }));
}
private _getAllUsersAndRoles() {
ApiHelper.CallApiForJson({ method: FetchMethod.Get, route: ApiRoute.Admin })
.then(json => this.setState({ items: json, status: PageStatus.Loaded, statusMessage: “Users and roles loaded.” }))
.catch(error => this.setState({ status: PageStatus.Error, statusMessage: `Loading of users and roles failed with message: ${error}` }));
}
private async Task GetUserDataAsync()
{
// reset the userData object
userData = new RoleBasedAccessModel();
UserRoleListItems = await UserRoleService.GetAllAccessUsersAsync();
base.StateHasChanged();
}
private async Task AdduserDataAsync(EditContext editContext)
{
// set the new user GUID
userData.Id = Guid.NewGuid();
var ret = await UserRoleService.AddNewUserAccessAsync(userData);
// get data for the list
await GetUserDataAsync();
}
private async Task UpdateUserAsync()
{
var ret = await UserRoleService.UpdateUserRolesAccessAsync(userData);
// get data for the list
await GetUserDataAsync();
}
private async Task DeleteUserAsync()
{
var ret = await UserRoleService.DeleteUserAsync(userData);
// reset the userData object
userData = new RoleBasedAccessModel();
// get data for the list
await GetUserDataAsync();
}
interface IRoleModel {
roleId?: string;
roleName: string;
}
interface IRoleManagerModel {
userEmail: string;
userFullName: string;
roles: IRoleModel[];
id?: string;
}
interface IRoleManagerState {
items: IRoleManagerModel[];
item: IRoleManagerModel;
columns: IColumn[];
selectionMode?: SelectionMode;
status: PageStatus;
statusMessage: string;
}
class RoleManager extends React.Component<{}, IRoleManagerState> {
private _selection: Selection;
constructor(props: IRoleManagerState) {
super(props);
// data list columns collection
public List<BFUDetailsRowColumn<RoleBasedAccessModel>> Columns = new List<BFUDetailsRowColumn<RoleBasedAccessModel>>();
// User role items for the data list
List<RoleBasedAccessModel> UserRoleListItems = new List<RoleBasedAccessModel>();
// data list selected Item
Selection<RoleBasedAccessModel> SelectedItem = new Selection<RoleBasedAccessModel>();
// form data bound object
RoleBasedAccessModel userData = new RoleBasedAccessModel();
// component attribute collection
private Dictionary<string, object> InputAttributes { get; set; } =
new Dictionary<string, object>()
{
{ “form”, “addUserForm” }
};
protected override async Task OnInitializedAsync()
{
var authenticationState = await AuthenticationContext.GetAuthenticationStateAsync();
var isUserAuthorized = authenticationState.User.IsInRole(Roles.Admin);
if (isUserAuthorized)
{
Conclusion
Here we have a web application, written twice, with two frameworks that our team had no-to-little experience with (React & Blazor). As always, use the right tool for the job, but in this scenario, the nod goes to Blazor. This is because our team is more familiar with the .NET language and general syntax (C# / Razor). The team felt that debugging was easier and code reuse was better with Blazor framework.
Want more information?
Ready to start your digital transformation implementation with Blazor? Or are you interested in learning about how iSoftStone can help you with your next web development project? Please contact us!