
Nuxeo recently released the 2021 version of its flagship enterprise content management and digital asset management platform. If you are an existing Nuxeo customer or a potential customer who has a trial account, you may be interested in trying LTS 2021. This article provides a user-friendly explanation of how to use the Docker image to very quickly begin previewing LTS 2021 in a temporary environment.
We will create a vanilla instance of Nuxeo in a Docker container, and we’ll make sure that it includes some basic sample content as well as the API playground.
What is Docker?
Docker allows you to create lightweight virtual containers, including on your local computer, which are isolated from the rest of your computer. For our current purposes, this makes it very fast for you to create new, vanilla instances of Nuxeo (or other applications) at any time to test things or to create quick demos. (Docker can also be used for Production environments, but that goes beyond the scope of this article)
Using Docker
Command line
We will use the command line or PowerShell (in Windows), the terminal (in Mac), or Bash (in Linux) to issue text commands to Docker to have it download the Nuxeo LTS 2021 image and install it to a container. Downloading and installing Docker Desktop (see below), will give you the ability to issue commands to Docker via the command line.
Graphical User Interface (Docker Desktop)
Docker Desktop is an application available for Windows, Mac, and Linux. It provides a user-friendly interface for interacting with your containerized applications.
After we use the command line to create the Nuxeo container, we’ll then use Docker Desktop to easily start and access the application.
You can download Docker Desktop from https://www.docker.com/products/docker-desktop. This includes the tools needed to issue commands to Docker via the command line.
Getting access to the LTS 2021 Docker image
To pull the LTS 2021 image, Docker will need to be able to access docker-private.packages.nuxeo.com, and so you will need to request that Nuxeo grant you access to this private repository. This access is not typically given by default when your Nuxeo user account is created-you will generally need to create a help desk ticket with Nuxeo to request access.
- Go to jira.nuxeo.com and create an SUPNXP ticket to request this access or send an email to your account representative.
- Once they have granted you access, you will need to create a token that Docker can use to access the repository. (This is different from the token that you create via Nuxeo Studio for registering your instance.)
- Go to packages.nuxeo.com and log in with your normal Nuxeo user account credentials.
- Once you’re logged in, click on your username in the upper right corner of this application, and go to User Token, then click on Access User Token. The system should provide you with a token name and token code. You will need to use these in a few minutes.
Creating a sandbox instance in Studio
You will also want to create a sandbox in Nuxeo Studio with which you can register this instance. (Nuxeo Studio is a low-code, wizard-based interface for building applications in Nuxeo.) You need to register your instance in Nuxeo Studio in order to be able to access your instance’s user interface and in order to be allowed to download certain add-on packages.
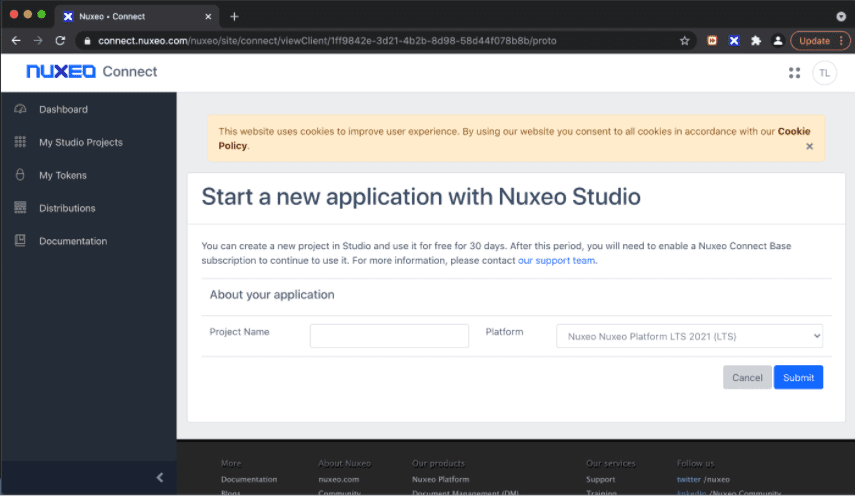
- Log into connect.nuxeo.com using your normal Nuxeo user account credentials.
- Go to “My Studio Projects” in the left nav, and then click the button to “Create new Trial Studio Project”. Name your application, and, for “Platform” make sure that “Nuxeo Platform LTS 2021” is selected.
- Click Submit, then, back on the main screen, scroll down to find the project that you just created.
- Click on the “Edit” button. This will take you to the details screen.
- Click on the “Instances” button, and then click on “Register an Instance”.
- Be sure that “Instance Type” is set to “Development instance”.
- Leave the Technical Identifier blank, and enter a short Description if you would like.
- Then click on “Register”.
- Copy the CLID on the next screen – we will use that identifier to register the instance. (You should also make note of the name that you gave your project – we will use that shortly as well)
Creating, registering, and starting the instance
You should now open your preferred command line tool, such as the Windows command line, PowerShell, the Terminal (in Mac), or Bash (in Linux).
Input the following command:
docker login docker-private.packages.nuxeo.com
You will then be prompted for your username and password. This is not your Nuxeo username and password. Instead, this is where we’ll use the token name and token that we generated from packages.nuxeo.com. Use the token name as the username, and the token as the password.
For this next step, you’ll need the name of your project and the CLID. You should also think of a name for this specific instance.
We’ll then need to construct a command to put into the command line or terminal. Please note that you will need to add in that [INSTANCE NAME] that you’ve come up with, the [PROJECT NAME] that you created in Nuxeo Studio, and the [CLID] that Nuxeo Studio assigned. Enter these in the places indicated below (making sure to delete both the highlighted words and the opening and closing square brackets below):
docker run –name [INSTANCE NAME]
–rm -ti -p 8080:8080
-e NUXEO_PACKAGES=”nuxeo-web-ui nuxeo-showcase-content nuxeo-api-playground [PROJECT NAME]”
-e NUXEO_CLID=”[CLID]”
-e NUXEO_DEV=true
docker-private.packages.nuxeo.com/nuxeo/nuxeo:2021
If you’ve installed older versions of Nuxeo in the past to use for digital asset management, you may be wondering why we didn’t include “nuxeo-dam” in “NUXEO_PACKAGES” above. You will actually get an error if you include that. The reason for that is because the digital asset management features are included by default in LTS 2021.
After you execute the command, you will see progress being logged to the console. You will likely see some errors related to FFMPEG. FFMPEG is used for video previews and conversions in Nuxeo, but it is not included in the Docker image. Some additional instructions are available for installing FFMPEG, but this requires creating a Dockerfile, which goes beyond the scope of this quick intro article. For our simple initial test installation, we’ll go without it, and video previews won’t work for now.
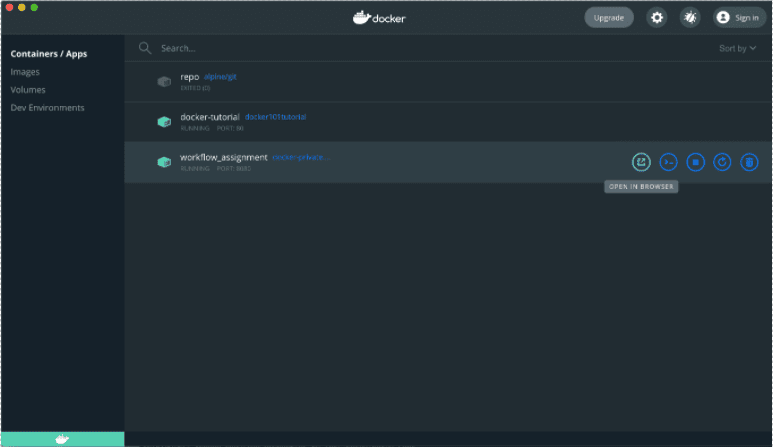
The instance should automatically start. If you open up Docker Desktop, then after a couple of minutes, you should see your container, and the icon for your container should turn green once it has started. You can press the button in Docker Desktop to open the container in your browser, or you can simply open a browser and go to localhost:8080.
Want more information?
For more information, view Nuxeo’s documentation on installing their Docker image and on Maven usage for LTS 2021, as well as Nuxeo’s Quickstart Guide on Docker. There is also a Nuxeo University course on getting started quickly with Nuxeo.